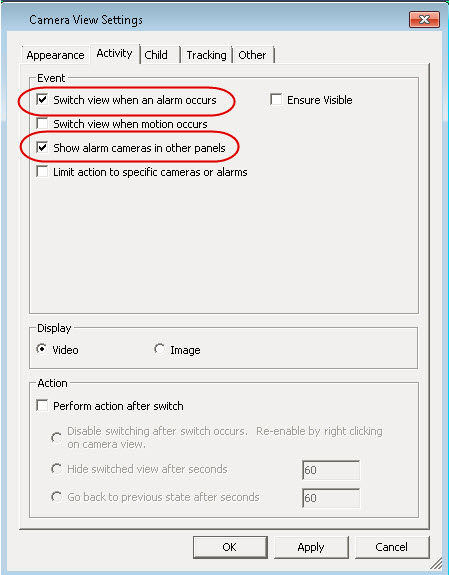
• Event
• Display
• Action
• You can force a Video Panel to automatically switch to a specific view when an event occurs.
When a camera is set to Switch view when an alarm occurs, you can lock and unlock the current video using a keystroke or by right-clicking and selecting Enable Automatic Switching. Keystroke: Press and hold SHIFT and click the video panel to temporarily pause and prevent camera switching. Repeat it to resume camera switching. |
• The switching event can be an alarm (defined in Rules), or it can be motion (detected by motion analytics engines such as VE150 and VE250). An alarm can be from an I/O device that is associated with a camera.
• Limit action to specific cameras - If you are connected to many farms/servers/cameras you may want a view to automatically switch only to a subset of all cameras. You select the cameras that should be in this set. This is useful if you have 4 Multi Views open and you are monitoring 1000 cameras where there is rarely activity. The 4 Video Panels within a Multi View window can be configured to always show video from the last 4 cameras that had activity.
• Choose whether you want to automatically switch to the live video or to the still image.
• An action can be performed after the switched view:
• Disable switching after switch occurs - As an example scenario, imagine a Video Panel switches and the operator watches the camera, then another alarm occurs on a different camera that causes a second switch to a new view. The operator may be frustrated that the view has automatically changed. In such a case, it might be useful to Disable switching after one switch occurs. However, if the operator needs to re-enable switching, the operator must right-click on the live view and select the Enable Automatic Switching menu option.
• Hide switched view after seconds - If the view should be blank unless an event of interest has occurred, then select this option. When no event has occurred, the panel will be black with the text “Waiting for event.” When an event occurs, the video will pop up and a countdown timer will be displayed that shows how many seconds are left until the “Waiting for event” state. The number of seconds to wait before blacking out the live view can be specified in the text box.
• Go back to previous state after seconds - As an example scenario, you are watching live (or historical) video for camera 1. The panel switches to show an alarm raised from camera 2. Sixty seconds later, camera 1 goes back to previous state, that is, continues playing live (or historical) video for camera
• Symphony will not automatically switch a Video Panel to a camera that is already being displayed in another camera panel in that Camera View. • After a Video Panel automatically switches it will not automatically switch to another camera for 8 seconds. • If multiple Video Panels within a Camera View switch based on activity, only one will switch - the one that switched furthest in the past. Each Camera View operates independently; therefore, if you have 2 cameras in different Camera Views set to automatically switch based on activity, they may both be showing the same camera. • To disable switching, the user must click on the video image in the panel. |
To hide the view until next event, one-time only, right-click on the Video Panel and select Hide View Until Next Event. |
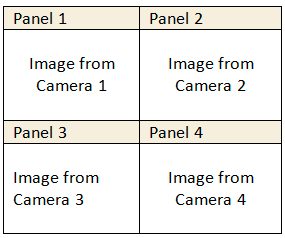
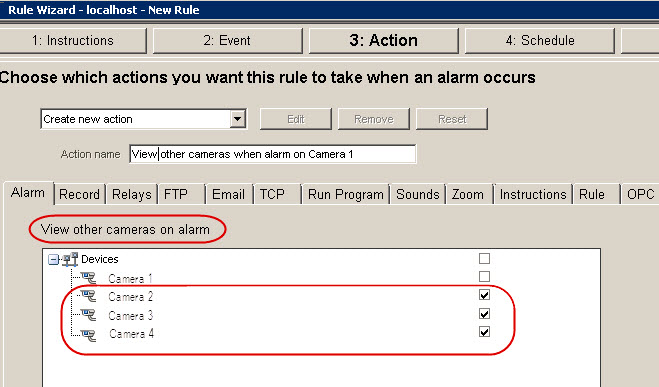
An intruder breaks through door and enters room. • Camera 1 focused on door. • Cameras 2, 3, and 4 – all show interior space related to door. • In Symphony Client 2 x 2 multi-view panels with no cameras currently displayed Task: • Set up Symphony so that image from Camera 1 appears immediately in a multi-view panel when an alarm is raised and that cameras near the door are also displayed immediately when an alarm is raised on Camera 1. Set up rule in Rule Wizard1. In the Rule Wizard, Camera 1, which is focused on a door, is selected. The appropriate Video Engine and mask are set up as necessary. 2. Click Next. 3. In the Alarm tab, you select all the cameras from which you want to see an image if an alarm occurs on Camera 1. In this example, you want to see images from Cameras 2, 3, and 4 if an alarm is triggered on Camera 1. 4. Click Next and set up the Schedule. 5. Click Save to save the Rule name for this scenario. 6. Click OK to close the Server Configuration dialog box.
Set up a camera view panel:1. In a camera-view panel (for example, 2x2),
right-click ONLY on the first panel 2. From the context menu, select Settings. The Camera View Settings dialog box appears. 3. Click the Activity tab. 4. Select the Switch view when alarm occurs check box. 5. Select the Show alarm cameras in other panels check box. (This option forces all the other panels in the Multi-view to display images from cameras associated with Camera 1. Recall, in the Rule Wizard, Cameras 2, 3, and 4 were selected to be viewed if an alarm was triggered on Camera 1.) When an alarm occurs on Camera 1, Panel 1 will now display the image from Camera 1 AND the other panels will display images from Cameras 2, 3, and 4. |