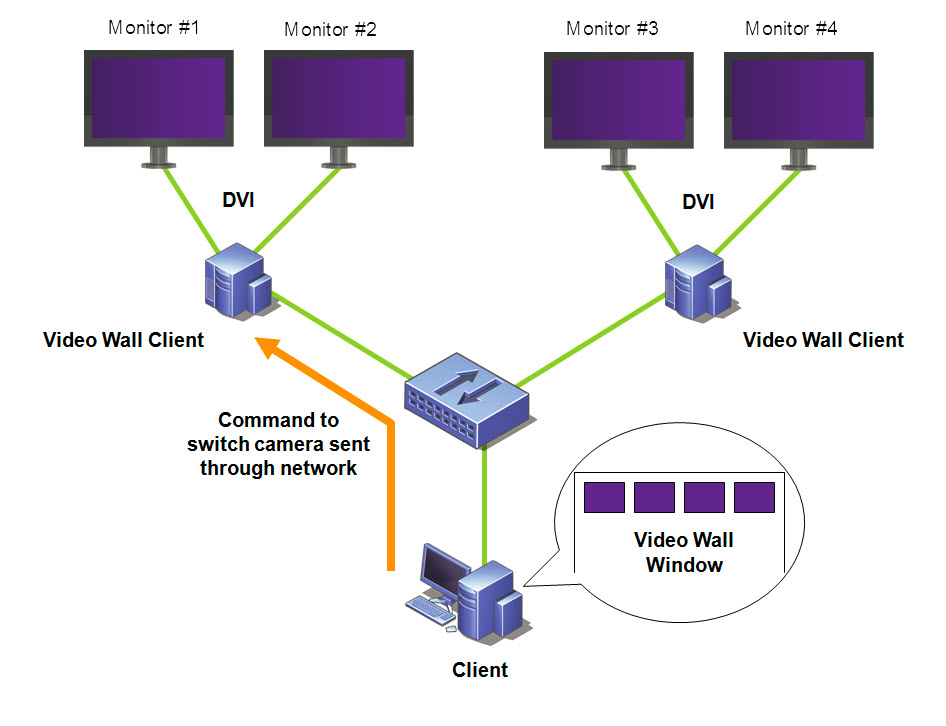
With Symphony, you can create video walls by using numerous PCs and controlling them remotely through the network.
• The video wall is not a physical wall but a software representation of a collection of real monitors displaying video.
• The collection of monitors could be on a single wall in a room or in different physical locations.
• Multiple video walls can be associated with a farm, each with different sets and layouts of monitors.
• Any Symphony Client can become a Video Wall Client.
• When a Symphony Client is designated as a Video Wall Client, all monitors associated with that client can be included in a video wall.
• Any client on the network can control the monitors remotely.
• For video
wall functionality, specific licenses must be used. Contact your Administrator.
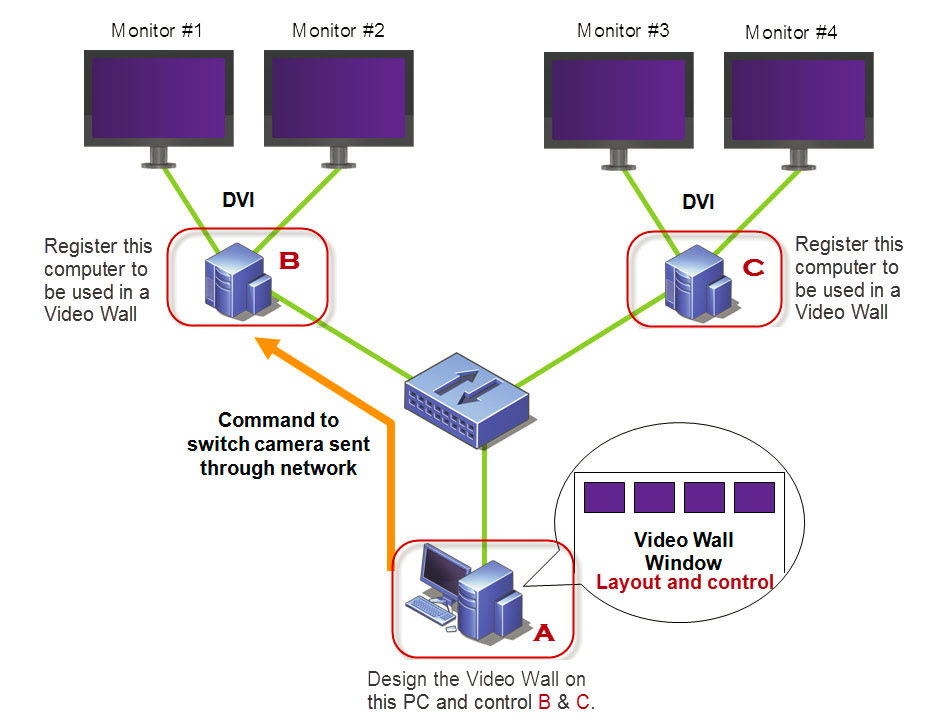
1. Login to every computer (client) that is physically connected to the monitors which will be used in the Video Wall. Using the following diagram as an example, you would login to computer (client) B or C or both.
2. Launch the
Symphony Client
software.
3. Click the Settings icon and select Video Wall.
4. The Video Wall dialog box opens with Video Wall Client Configuration tab active.
5. Click Register current Client. This allows you to remotely control that registered client from a video wall window you will create in Task 2. You will be able to remotely control video, switch cameras, create/change/close a Multi View and more of that registered client. Aimetis provides an SDK for this feature. For details, see https://www.aimetis.com/Xnet/Downloads/SDKs.aspx.
6. Click Save.
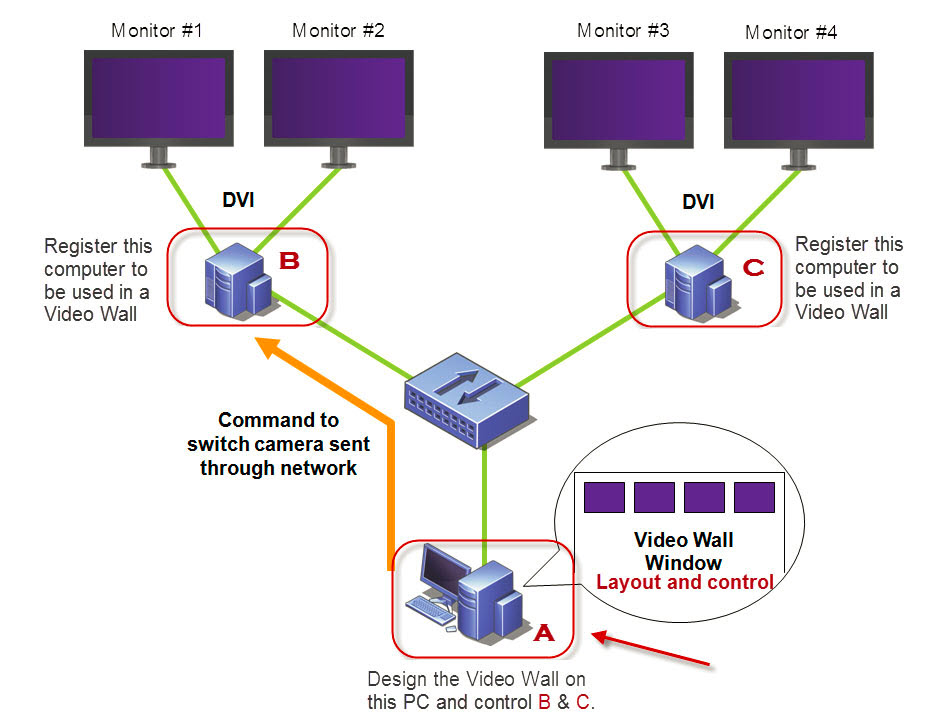
1. Login to a
computer (client) that you want to use to design the video wall layout
and control the computers you registered in Task 1. Using the following
diagram as an example, you would login to computer (client) A.
2. Launch Symphony Client.
3. From the View menu, select Video Wall. The Video Wall dialog box opens.
4. Click the Video Wall Client Configuration tab. Click Design Video Wall.
5. Click New to
create a new layout. By default, the layout is named VideoWall1. You
can rename the layout by clicking on the name to edit/type a new name.
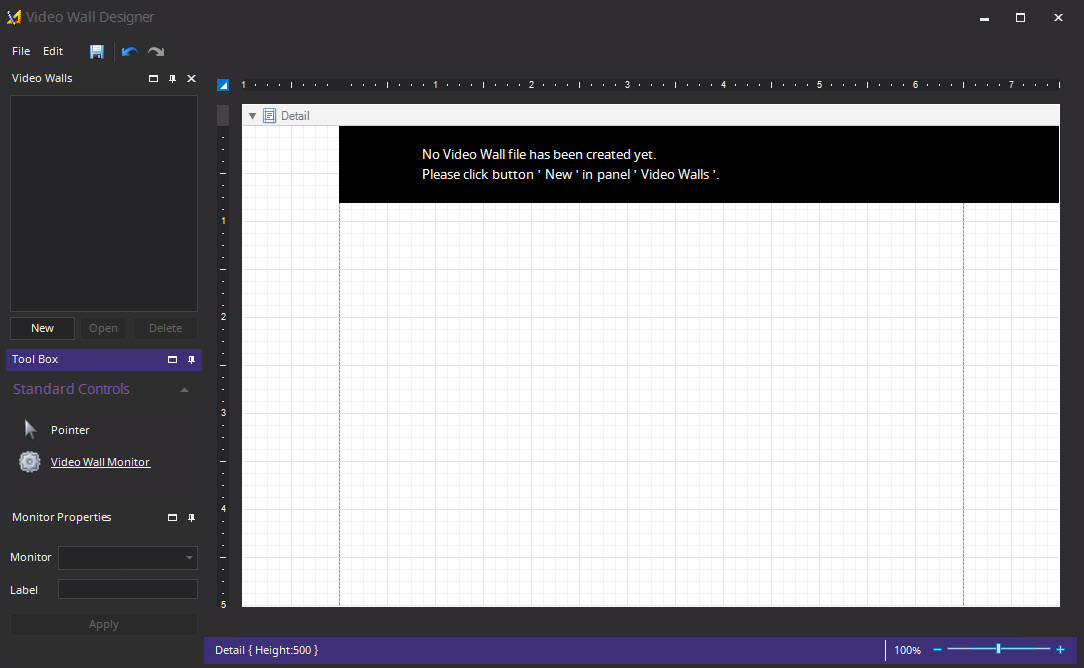
6. Select the name of the video wall and click Open. A message in the layout field appears, indicating that you must now select the monitors be used in the video wall you plan to design. Using the example diagram, you would select B-Monitor 1 or 2 or C.-Monitor 3 or 4.
7. In the left pane, under Tool Box, select the Video Wall Monitor icon link and drag it to the grid. If more than one monitor is connected drag it to the grid as well.
8. A black box including the name of the monitor is displayed in the grid. Click the box to activate it. The name of the monitor is displayed in Monitor Properties in the left pane in the Monitor and Label fields.
9. (Optional)
You can label the monitor with a short, easily identifiable name, for
example Monitor B. Edit the Label field to enter the name. Click
Apply.
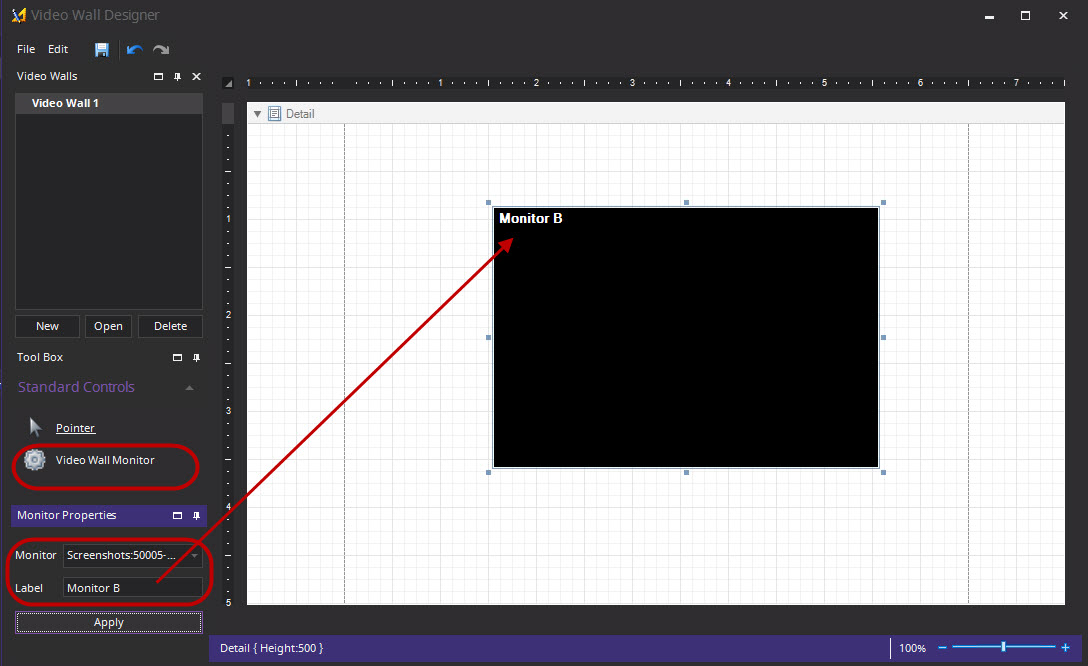
10. You can resize the monitors represented in the grid. Click on the monitor and drag the sizing boxes as necessary. To move the monitor in the grid, click on the center of the black box and drag the entire box.
11. When you are satisfied with the layout, you must save it. From the File menu, select Save and then Exit.
1. Click the Video Wall tab.
2. From the Current Video Wall drop-down field, select the layout that you created in Task 2. At this point, your are now in control of the display on other monitors. Using the example diagram, you would be in control of the layout on Client B or C.
3. You have several
options to control layout on the registered monitors:
Camera Tree
Add Camera View
Change Camera View or Close Camera
View
Camera Multi View Context Menu
Camera View Context Menu
Save Current Video Wall Layout/Load
Current Video Layout
1. From the main menu of the Video Wall dialog box, click the Camera Tree tab. The Camera Tree panel is displayed.
2. Drag a camera from the Camera Tree into the layout.
Allows you to change the layout of the registered clients to Camera View.
1. Click title
bar of the monitor in the Video Wall viewer to activate the button.
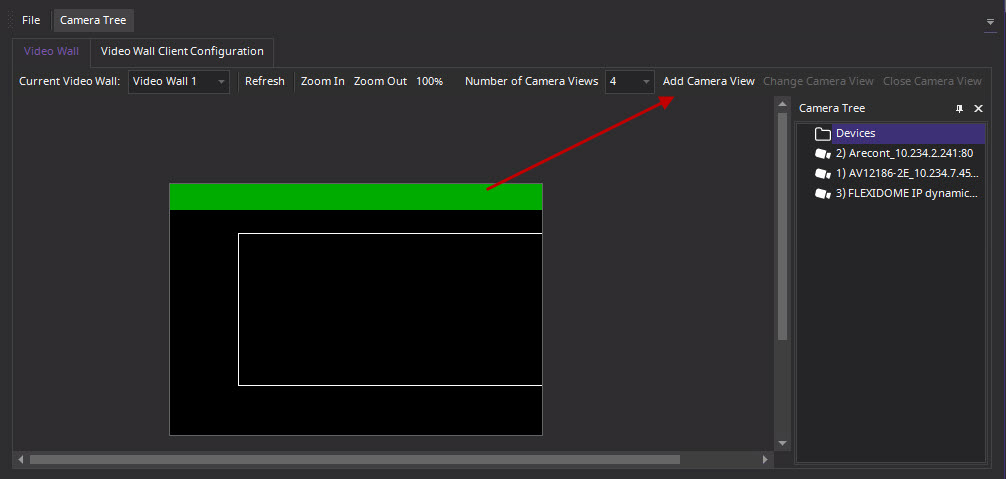
2. Click the Add Camera View button.
3. From the Number of Camera Views drop-down list, select the number of camera views.
Change Camera View or Close Camera View
You can change or close the views on the remote clients from here.
1. Click on the
Camera View bar. The Change Camera View and Close Camera View buttons
become active.
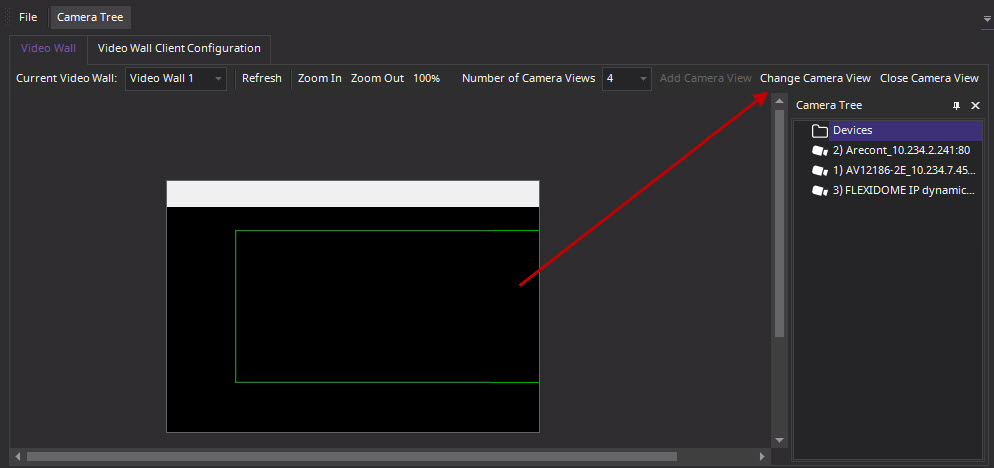
2. If you click Change Camera View, select the number of camera views from the Number of Camera Views drop-down list.
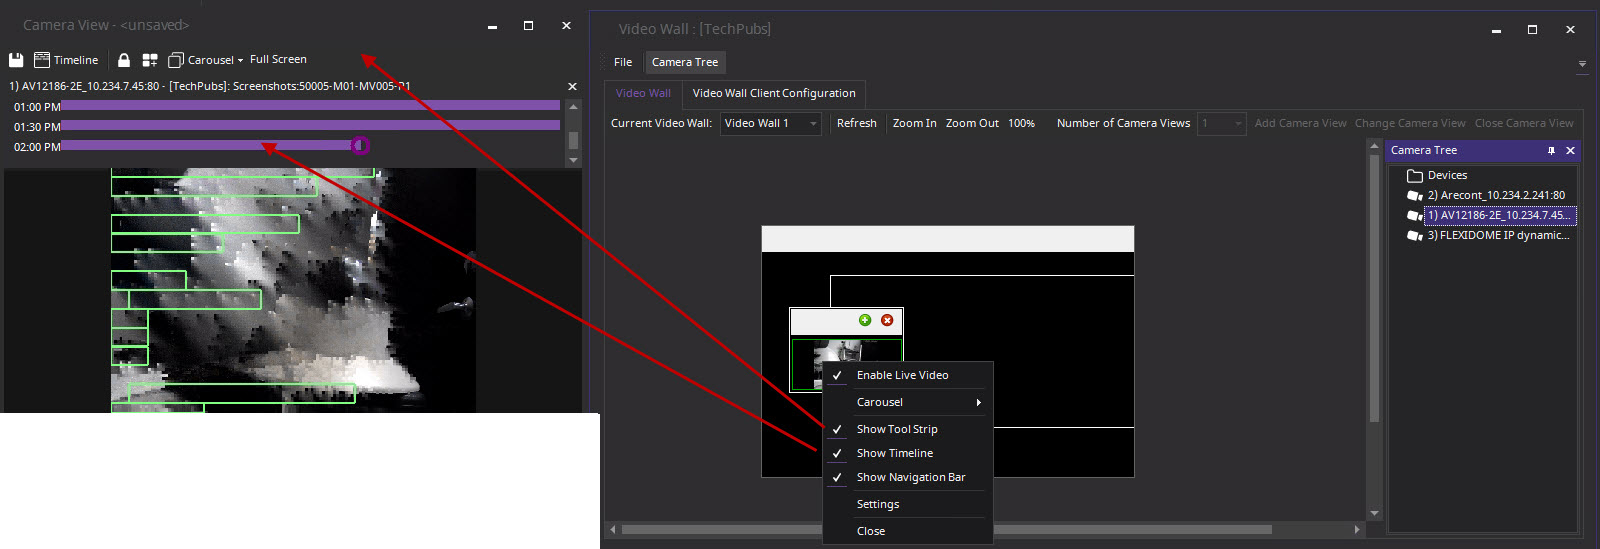
Camera Multi View Context Menu
3. If you have a Camera View display, right-click on the multi view bar (not the monitor title bar). The context menu appears.
4. You can show/hide the Tool Strip, Timeline, Navigation Bar, or display full screen on the remote clients.
1. Right-click on a panel (not the monitor title bar). The context menu appears.
2. You can enable
live video, show/hide the Tool Strip, Timeline, Navigation Bar,
or change the Camera View Settings on the
remote client.
Save Current Video Wall Layout/Load Current Video Layout
The layout is saved on the remote computer (client) and NOT on the controlling computer. Using the example diagram, the layout would be saved on computer B or C (if C is online) but not on A. Each connected (registered) video wall client saves (or loads) its client layout on its own machine.
The layout name, however, is also saved in the database.
Refresh
If you click the Refresh button, all screens are updated immediately; otherwise, the Video Wall Window updates each camera view in round-robin. It takes 30 seconds to update all camera views.
Zoom In/Zoom Out
Allows you to zoom layout. It does not zoom the images on the remote (registered clients).
In video wall manager, you can double-click on a panel to display the image in full screen mode. Double-clicking again restores the view to the previous state.