This analytic can be used for applications such as people counting and dwell time. Typical deployments include commercial buildings. Configuration options described here are not mandatory.
Note: For reliable tracking at the analysis resolution, an object must be at least 16 x 16 pixels in size.
Add a camera as per instructions in Device - Network (IP) Cameras or Video Servers.
Select a license from the Analytic License Requested list and click Update License.
In the Add Ons section, move the switch to ON for the analytic you want to use and click Configure. Configuration applies only to video analytics with settings that you can modify.
Use the default analytic settings or modify settings as per the information contained in the following tables.
Assign a rule to your camera based on this analytic.
Option |
Description |
Analysis Resolution |
Resolution which is used to analyze frames. Normally this is lower than Capture Resolution to conserve CPU. If you change the analysis resolution for a camera, you must update the rules that apply to the camera. |
Analysis FPS |
Frame rate at which the video engine analyzes frames. Can be set lower than the record frame rate. |
Simple Mode |
Set to ON by default. Switch OFF to display Advanced options. Advanced options are intended for system configurators and technical support staff. You can import, export, and view the XML file containing video analytic configuration settings. See the knowledge base article How to Use Advanced Options in Indoor People Tracking Analytic. |
Using the displayed image from the video, define the area in yellow (a mask) where objects in motion should be detected.
Select the Analyze option to define the yellow mask.
Select the Ignore option to erase areas of the yellow mask where objects should be ignored.
The Size slider adjusts the pen thickness.
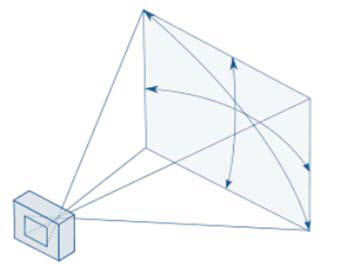
Left-click on the image and draw a line that will cause items (people) to be counted as they pass the delineated area.
The line appears with arrows indicating when movement is detected.
Click on one of the arrows to remove it. The remaining arrow indicates the direction of movement in or out of the delineated area.
![]()
To switch the direction, click on the existing arrow. It disappears and a new arrow appears in the reverse direction.
To reposition an endpoint, press and hold the CTRL key, click and hold the endpoint, move the endpoint to the desired location, and then release.
Options: Automatic, Calibrated, Manual
Automatic calibration determines the optimal camera configuration for scenes containing people. You can switch to manual calibration at any time, and the system retains the last best estimation of camera position detected.
Note: Symphony automatically applies a red mask to areas that are unsuitable for analysis.
Option/Design |
Description |
Grid |
Grid lines are 1 meter apart. Automatically displayed over scene. |
Reference person icon |
An orange colored form representing person size and position in an image. Four populate the image automatically. Move the reference person icons to various positions in the image, foreground and background as they would naturally occur. To add more reference person icons, click your mouse on the image. |
Delete Person |
Removes a reference person icon. Click the reference person icon and press Delete. |
Interactive section |
Allows you to adjust the grid and reference person size to match the underlying scene. Using your mouse, you drag the camera icon up/down and left/right. |
Zoom In and Zoom Out buttons |
Allow you to zoom in and out in the interactive section. |
Field of view (FOV) |
Horizontal field of view.
If you increase the value, you must drag the camera icon closer (down) to get the correct person size. If you decrease the value, you must drag the camera icon further away for the same rough size. If you obtain the exact camera position by measuring the actual height and distance, then you must adjust Field of view to make the reference people icons the right size in the scene.
Mouse wheel perspective control Allows you to control the amount of perspective in the scene without changing the overall scale. (Allows you to make a person icon a certain size while changing the Field of view so that the tilt of the other people icons and their relative size is correct.)
Position the mouse over the little diagram. Rotate the mouse wheel to increase or decrease the Field of view in 2.5 degrees increments, creating an opposite proportional change in the ground distance parameter.
Example: Ground distance is 10.0 meters and the Field of view is 60 degrees. One mouse wheel click changes Field of view to 62.5 degrees and ground distance to (60/62.5)*10.0 = 9.6 m. A mouse wheel click in the other direction changes Field of view to 57.5 degrees and ground distance to (60/57.5)*10.0 = 10.43 m. |
Pan |
Movement of the camera from left to right or right to left around the imaginary vertical axis that runs through the camera.
When the camera is pointed at the ground, it tilts the ground plane. When the camera is closer to horizontal, it looks more like a rotation of the ground plane.
Useful in an near-overhead view when the camera is pointing off to the side (that is, the deflection from vertical is not completely on the camera view’s up-down axis). |
Twist |
Rotation of the camera around the axis that extends directly out of the camera through the center of the view.
Useful in an angled view when the camera is twisted so that a vertical line in the world does not correspond to up-down in the image. Also useful if the ground in the image appears to tilt a bit from left to right. |
Height and Distance fields |
Values correspond to the movements of the camera icon in the interactive section. Note: You can adjust the height and distance simultaneously by holding down the Shift key and scrolling the mouse wheel in the calibration window. |
Warning message |
Symphony displays a warning message if the camera angle does not agree with Overhead selection. |
Move the slide bar to decrease or increase sensitivity for the following options.
Option |
Description |
Object Contrast |
Controls perceived similarities between the background and objects. If an object in the camera view appears similar to the background (such as a dark background and a person in dark clothing), increasing the object contrast sensitivity increases the analytic's ability to detect the object against the dark background. |
Object Motion |
Controls the foreground sensitivity needed for an object to be detected as a foreground object. |
Background Motion |
Controls the background sensitivity needed for an object to be detected as a foreground object. Important: If set to a low value, then objects with similar color as the background will NOT be detected as valid objects to track. |
Shadow Suppression (Simple) Shadow Suppression (Complex) |
Use Simple Shadow Suppression in cases where you have light shadows. Use Complex Shadow Suppression in cases where you have strong dark shadows. Important: Depending on the scenario, selecting these options can result in objects being missed (Complex) or shadows being tracked as objects (Simple). The strength of these settings have been optimized for best usage over a range of scenarios. |
Thermal |
Increases the sensitivity of the analytic by using thermal (heat) change analysis. |