 Visit http://aimetis.com/Support/supported-video-devices.aspx
for a list of supported devices.
Visit http://aimetis.com/Support/supported-video-devices.aspx
for a list of supported devices.Three kinds of device types can be added to Symphony Server.
Network (IP) cameras or video servers
Analog cameras (connected using either Winnov Videum 4400 VO or Eltronix MP3000)
External I/O Modules
 Visit http://aimetis.com/Support/supported-video-devices.aspx
for a list of supported devices.
To add or modify devices, click Server > Configuration. The Configuration dialog appears with the Devices pane by default. Adding and modifying cameras (and configuring their respective video analytic engines) is explained below, as well as adding I/O Modules to Symphony.
1. To add a new network camera or video server, click New
from the Devices pane. The device
configuration interface opens.
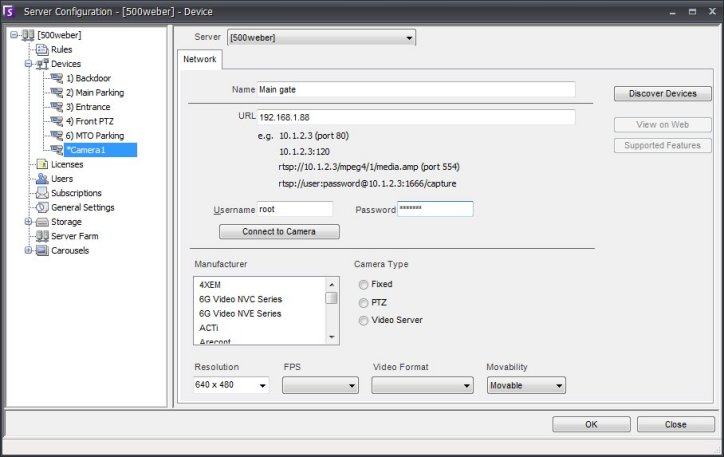
On the Network tab, enter the
Name you wish to call the camera,
URL which is normally the IP Address,
Username and Password
and click Connect to Camera to
detect the camera type and settings. The model, resolution, Record FPS
and Video Format will be auto-detected. If you wish to manually add the
camera, do not click Connect to Camera
but instead manually select the Manufacturer, Camera Type and set the
Resolution, Record FPS and Video Format appropriately. You may also click
Discover Devices to locate devices
on the network. The Movability
option specifies whether the device will automatically move to a redundant
server under a failover condition. If it is set to movable
then this device can move to another server in the farm during failover.
If it is set to unmovable
then the device can't be moved. Any device that
requires access to resources only available on a single server (i.e. COM
port, special SDK or drivers, etc) is unmovable. All
others are typically movable.
 For more information on Movability and Redundancy,
visit Server Farms.
2. Next, click on the Video
tab to configure advanced features of the camera.
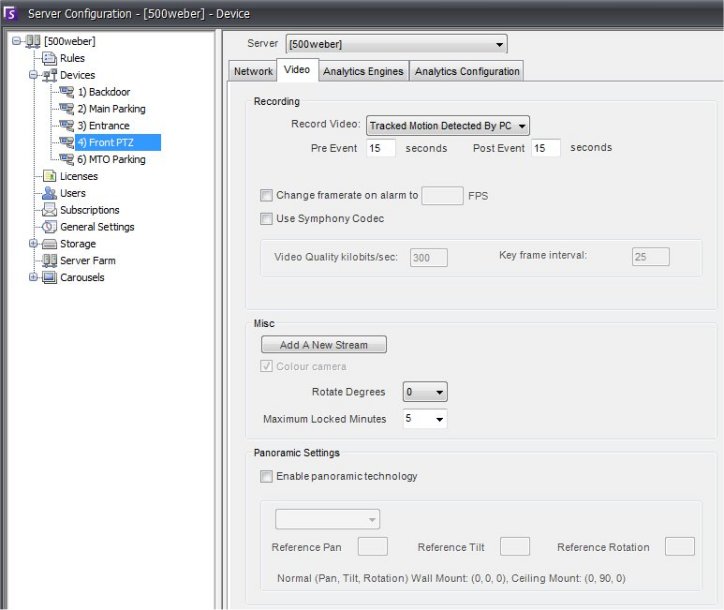
The Recording section is where
video recording is configured and where the Symphony Codec can be enabled.
Enabling the Symphony Codec could be useful in cases where the network
camera only records MJPEG video and Symphony is to recompress the video
as MPEG-4. The Record Video combo box allows users to specify when Symphony
should record video on the specific camera. Options available are:
|
Always: |
Symphony will also record video for this specific camera |
|
Schedule: |
will record video on the schedule specified by the user |
|
Schedule & Tracked Motion: |
will record video on motion but only during the time period specified by the user |
|
Pixel Changes: |
video is recorded whenever pixel changes are detected (a tree moving in heavy wind could cause pixel changes and therefore cause Symphony to record video) |
|
Tracked Motion: |
video is recorded if objects are tracked through the scene (normally a person or vehicle moving through the scene is tracked as motion, but moving tree branches should not be tracked and therefore video would not be recorded) |
|
Motion on Camera: |
video is recorded using motion detection capabilities inside network camera itself, not using a video analytic engine from Symphony (quality of motion detection similar to Pixel Changes) |
|
Schedule & Motion on Camera: |
Same as Motion on Camera option, however recording will occur if motion is detected during a specific time interval as defined by user. |
|
Never: |
video is not recorded, unless specified to be recorded in a Rule (Action). |
If the network device allows, additional network video streams can be added from the same physical device. This is useful in the situation where one level of quality of video is defined for recording and another for live video, for example. To add another video stream for the current network device, click Add a new Stream. The video recording options available are the same as to what was defined by the default stream. Further, video resolution can also be defined independently for the additional stream(s).
The picture can be rotated by modifying the Rotate Degrees combo box, as well as defining how long a PTZ camera should remain in its current position before it returns to its Home Position after a user moves it by modifying the Maximum Locked Minutes value. The Maximum Locked Minutes value therefore only pertains to PTZ cameras, not fixed cameras.
Finally, the Panoramic Settings section allows users to configure settings related to 360-degree camera lenses. Currently Immervision and IPIX 360-degree camera lens technology is supported. By enabling panoramic technology and selecting the appropriate camera type, users can de-warp 360-degree video in Symphony Client.
3. By selecting the Analytics Engines tab, the individual video engines can be added to the camera. An Enterprise license is required to enable video engines in the Analytics Engines tab. This step is only necessary if video analytics are to be configured on this camera.
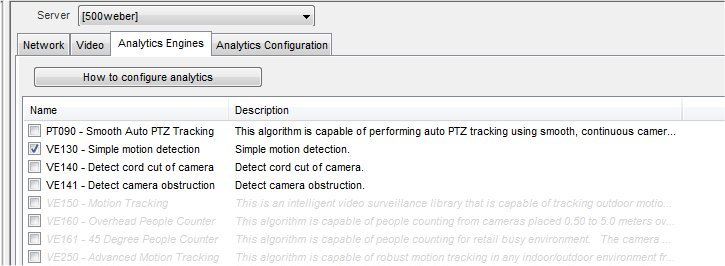
The default engine is the VE250. Different video (analytic) engines detect different events. When configuring Rules, the type of analysis available or "Event" is determined by which engine is selected here. Not all analytic engines can be run in parallel. By selecting the VE250 for example, it will disable other similar engines (such as VE150 or VE160). If an engine you wish to enable is disabled, try disabling other engines to allow the selection of the desired engine.
 For information on how to configure
and select the video analytic engines, refer to the Video
Analytics section. For information on licensing, consult the Licensing
section.
4. Click Apply to save your settings and move onto the Analytics Configuration tab, or click OK to save settings and close the dialog without configuring the selected video analytics engines (default configuration settings will be used). For details on the Analytics Configuration tab for each video analytic engine, refer to the Video Analytics section.
 Cameras can be imported
using the Import Cameras function.
Analog cameras can be connected to Symphony in two ways. The simplest way is to use a video server (a network device that converts analog video to digital video). In this scenario, Symphony connects to the video server the same way it connects to a network camera, therefore follow the steps above. To add an analog camera directly to Symphony, a capture card must be installed in the server itself (make sure the capture card is supported by Symphony). Next, click on the Devices tab to load the devices window (shown below) and select the down arrow by the New button to select Add An Analog Camera.
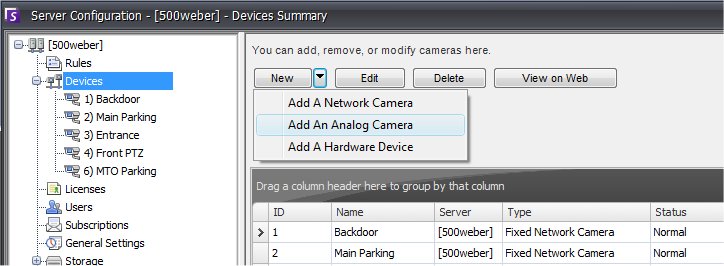
The Analog tab appears
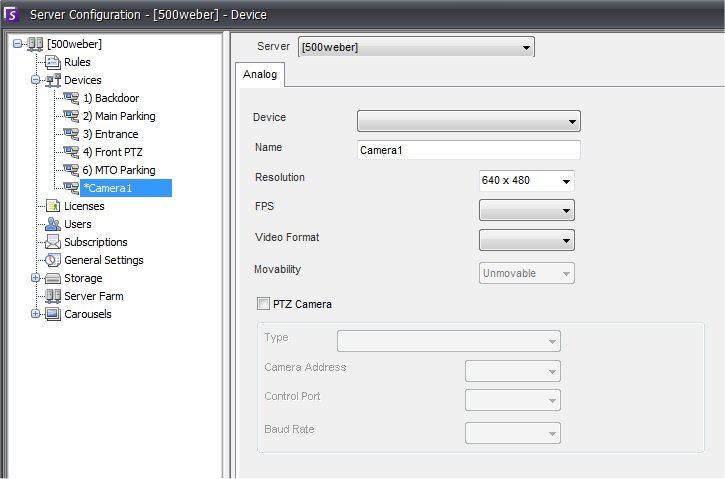
On the Analog tab, you can modify basic configuration for the camera.
|
Device |
This combo box allows you to select the available channel on the capture card. |
|
Name |
Enter the name of the camera here (for example, Lobby Camera) |
|
Resolution |
Configure the resolution of the camera |
|
FPS |
Configure the frames per second to record video |
|
Video Format |
Configure the video format, such as MJPEG or MPEG-4 |
|
PTZ Camera |
Select this if the channel selected in the Device field is connected to an analog PTZ camera. If a PTZ camera is connected to this channel, additional information such as the Type (which denotes the type of analog PTZ camera), Camera Address (which denotes which address the PTZ camera is configured), and Control Port (which denotes which COM port the serial adapter used to send and receive control signals to camera is connected) must also be configured. |
Next, configure the Video pane and Analytics pane as described in step 2 and 3 above.
Click the arrow beside the New button and select Add a Hardware Device. The Hardware Device tab appears.
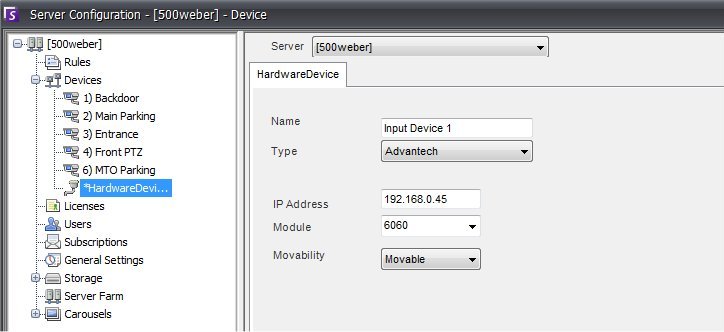
In the Name field, enter a name you wish to use for this device. In the Type field, select the device that is to be configured. The recommended device is the Advantech (Adam) 6060. If it is an I/O device that is connected to the serial connection of the server, the COM Port address and Baud Rate must be properly configured. If an IP-based I/O device is configured, enter the IP address of the device and other required information. Movability field defines whether the device can be automatically moved to another server in case of failure. For more information, visit the Server Farm section.
 For more
information on how to configure IO Devices, visit the Technical Article
- Using External IO Devices with Aimetis Symphony.